EMILY HUANG
3D Character Art,
Animation
I'm Emily, a 3D character artist specializing in stylized, vibrant characters for games! On the side, I also dabble in character design and 2D animation.


3D Art
Hades Megaera
Based on concept art by Rose (@cateille)
Real-time character (2024)
Tools used: Zbrush. Blender. Substance Painter. Marmoset Toolbag
For this piece, I wanted to focus on refining the quality of my stylized PBR characters, and what better way than with some Hades fanart! I also had a fun time rigging and animating her using Blender.

Megaera

Megaera

Closeup

High Poly Sculpt

Wireframes

Material Breakdown

Breakdown


I thought it would be fitting to have Megaera spin into frame and lock eyes with the camera as if the player were about to engage in a battle with her! To do this, I rigged and animated her using Blender and rendering the animation with Marmoset Toolbag. For the eye blinking, I animated blend shapes.

Rig Setup

Sky Knight
Based on concept art by ZhongX Wu
Real-time character (2023)
Tools used: Zbrush. Maya. Substance Painter. Marmoset Toolbag. Advanced Skeleton
While taking a CGMA course, I wanted to get more practice with stylized PBR character creation for games, so I chose this lovely fantasy, stylized concept. For the hair, I decided to try out an anisotropic look to match the anime style of the concept art. I created this model in A-pose and rigged it with Advanced Skeleton in Maya. Rendered in Marmoset Toolbag.

Sky Knight

Sky Knight


Using Marmoset Toolbag, I baked out normal, AO, curvature, and object id maps. Using those maps, I textured the model using Substance Painter. For the hair, I created an additional flow map to help achieve the anisotropic look.

SkyKnight A-Pose

High Poly Sculpt

Wireframe Texture Breakdown


Book Mage
Based on concept art by Ian Su
Real-time, hand-painted character (unlit render) (2022)
Tools used: Zbrush. Maya. 3D Coat. Substance Painter. Marvelous Designer.
In my last term in college, I wanted to create a stylized game character meant for a top-down mobile game. My goals for this character were to practice hand-painted texturing and game optimization. I aimed to keep the polycount under 20k tris and use a 2k diffuse map with baked lighting for the material.

Book Mage

Book Mage Closeup

Wireframe Texture Breakdown

Book Mage Prop

Prop Wireframe Texture


For the texturing, I started by setting up the basic colors, roughness, and metalness in Substance Painter to create some initial texture maps: color, AO, and baked lighting. I then brought those maps to 3DCoat to act as a rough lighting guide. Starting in grayscale helped me paint out the values first and focus on the lighting and material read. Then using Photoshop’s gradient mapping tool, I applied colors and completed the textures with more handpainting.

Texturing Gif

Real-Time High Bun
Real-time hairstyle made with hand-placed hair cards. (2024)
Tools used: Maya, Xgen, Zbrush, Marmoset, Photoshop
Head Base Model provided by Naky Solanki
I created this real-time hairstyle while taking a CGMA course to learn how to tackle haircards. It was really interesting to go through the pipeline of creating a hairstyle meant for games! I used Xgen to create the hair cards and placed them with Zbrush. From the Xgen hair clumps, I rendered out AO, flow, id, and alpha maps. Using the AO map, I generated the normal map with xNormal. I then used Photoshop to edit and paint over the texture maps to create the albedo, specular, and gloss maps. Renders were done using Marmoset Toolbag.

Raytrace Renders

Raytrace Closeup

Wireframe

Sculpt Pass

Textures


To research the high bun hairstyle, I first found references. To study them, I did a draw over to identify the silhouette, flow, clumping, hairline location, and strays. Doing so helped me identify some key features for the sculpt pass to make it look like a casual high bun that has become a bit messy after a day’s events.
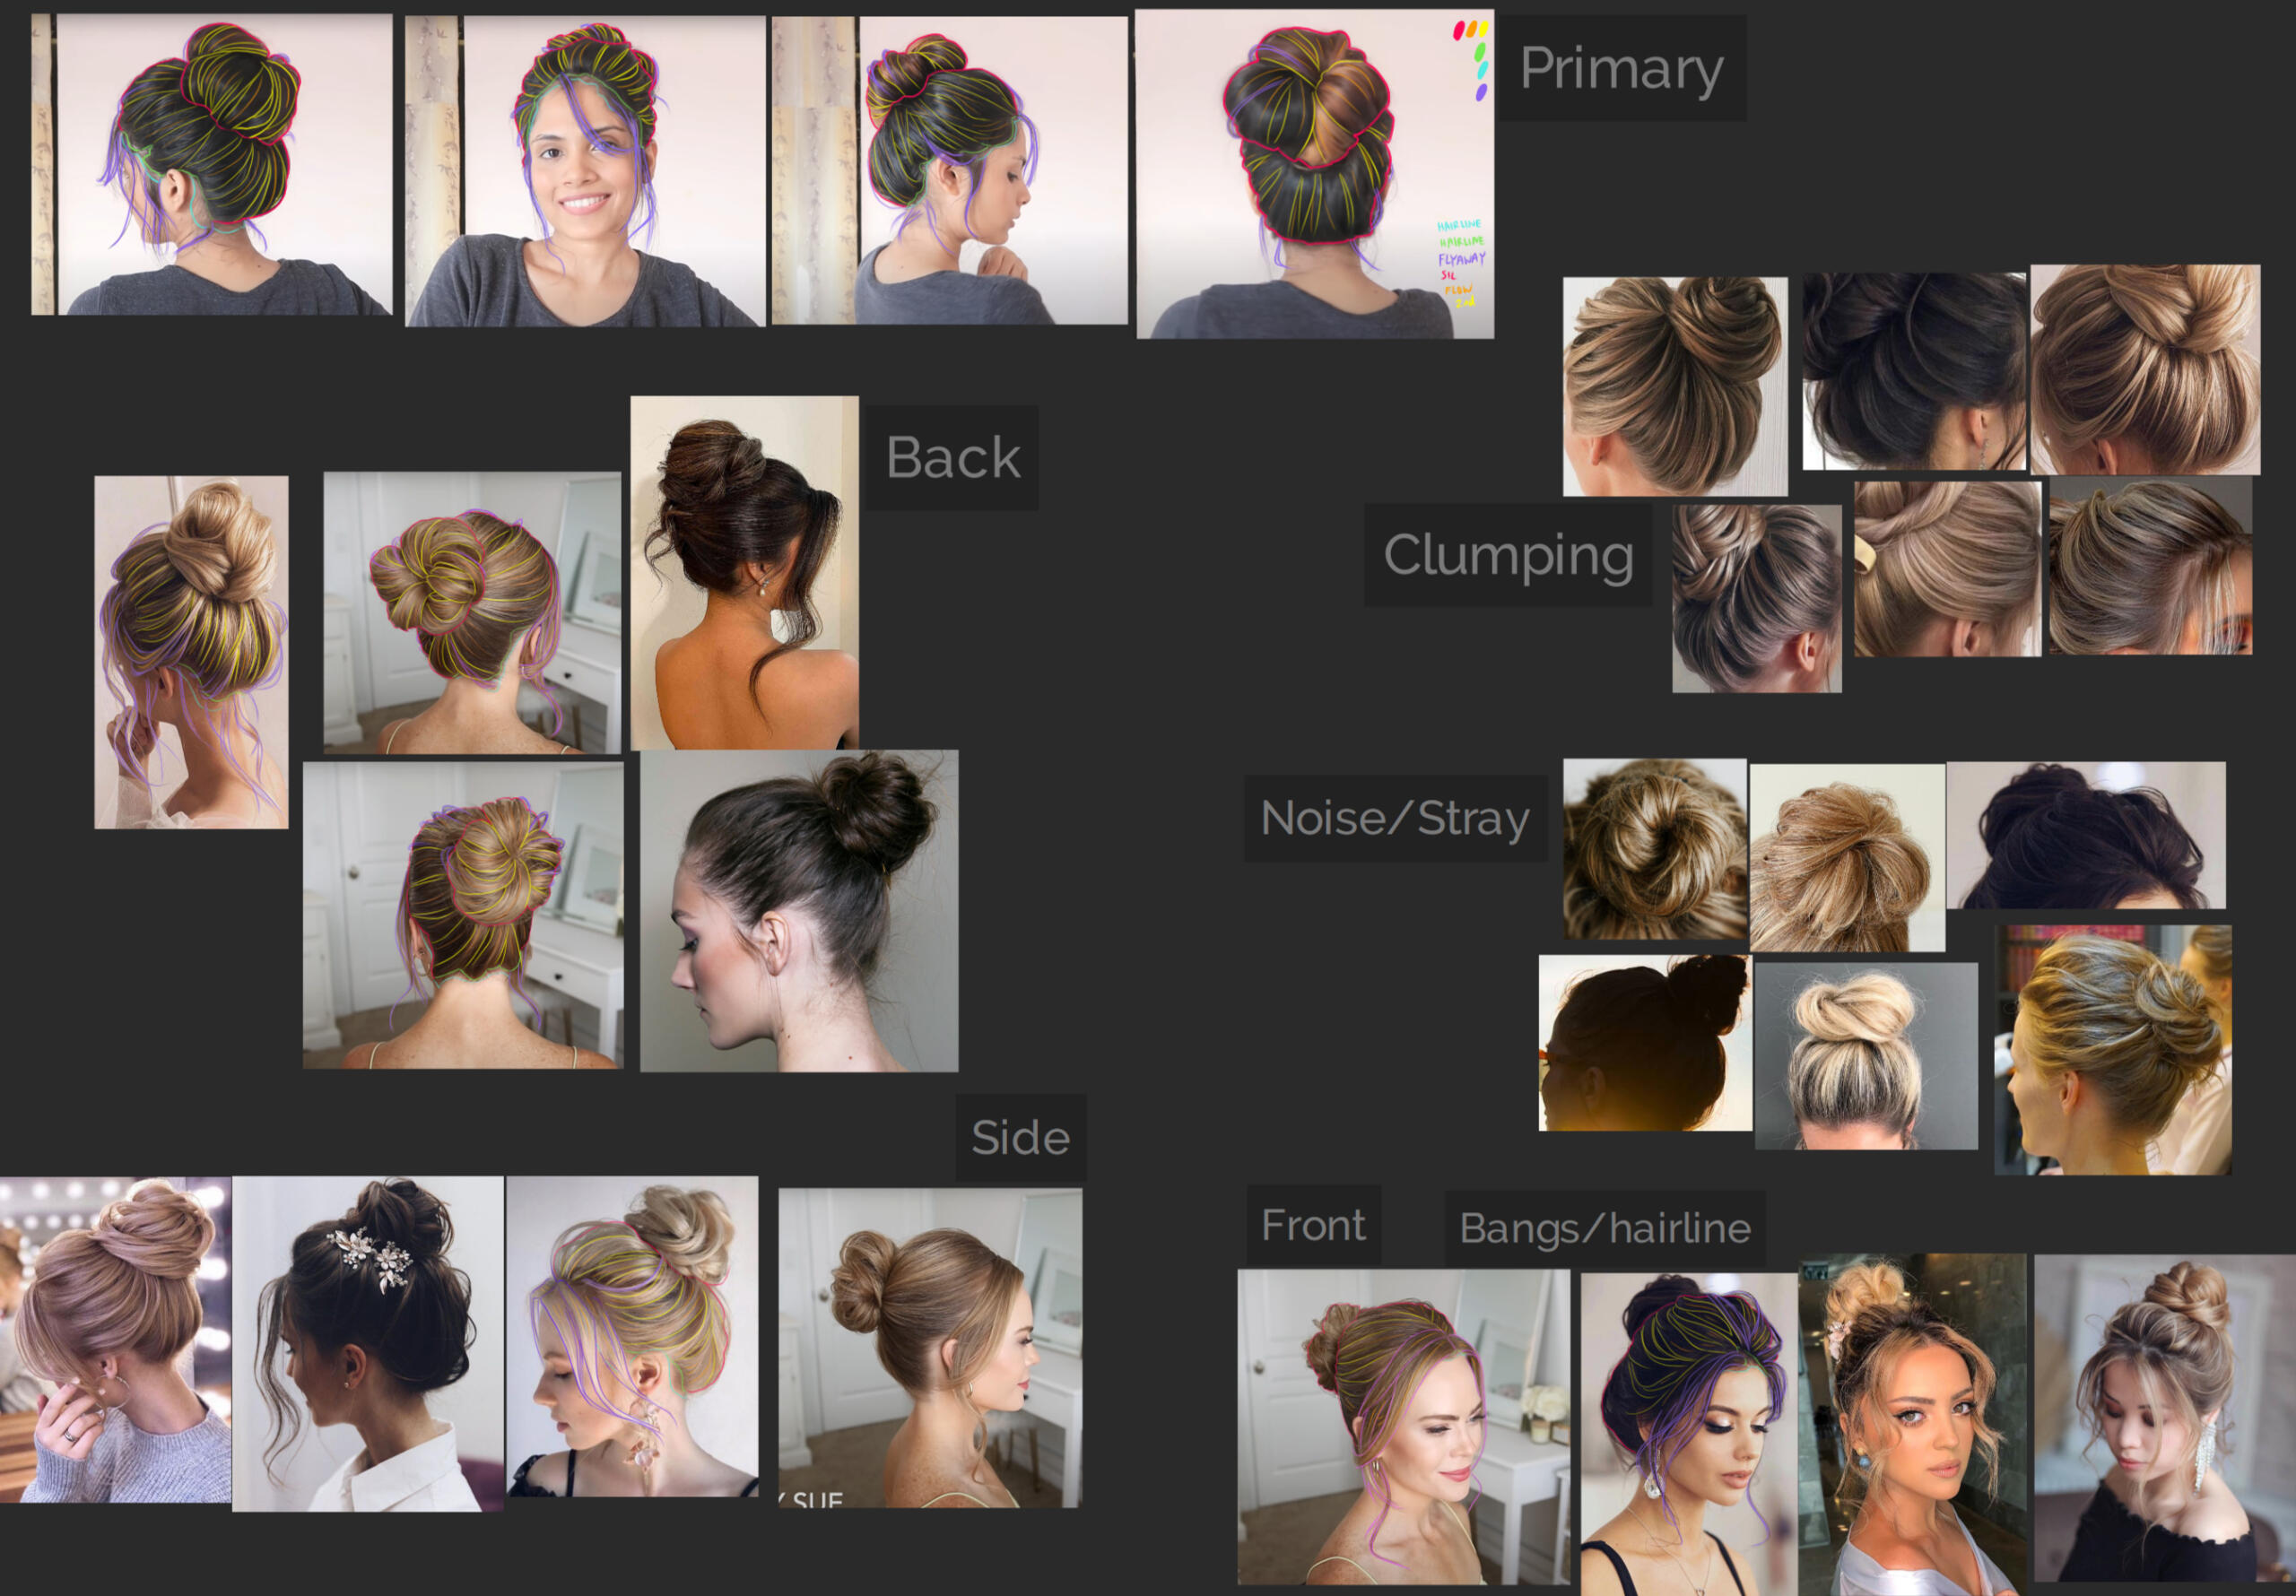
I approached the card placement in layers: base, primary, secondary, transition, and strays/flyaways (color-coded for better viewing). I found that placing the cards in ZBrush gave me good control over the overall construction, flow, and rhythm of each layer. For better viewing, I've assigned each layer a different color.
Hunter
Personal Design
Zbrush Sculpt (2021)
Tools used: Zbrush, Photoshop
For this project, I wanted to design my own character and bring them to life as a 3D sculpt!

Hunter Sculpt

Hunter Sculpt

Hunter Design

Hunter Character Sheet


Sci-Fi VR Chair Design
Personal Design
Prop (2021)
Tools used: Maya. Substance Painter, Unreal Engine
I designed this sci-fi VR chair inspired by the movie The Matrix. After modeling, I thought it would be cool to bring it to life by animating it opening and closing its spine claws. To do so, I rigged and animated it in Maya and imported it into Unreal Engine for the final render.

VR Chair

Wireframe Breakdown

Chair Concept

Reference Board


Rigged and animated with Maya. Imported into Unreal Engine for render.
LUXE Restaurant Design
Team Project with Jonathan Ma and Anthony Fanticola
Environment Design (2021/2022)
Tools used: Maya, Substance Painter, Unreal Engine
My group and I created this playable 3D space with a moody atmosphere. My role was to help design the overall look and feel of the restaurant, as well as create a portion of the 3D props (shown in the prop sheets) and texture the majority of the assets our team made. Jonathan also helped design the layout, contributed heavily to the creation of the more large-scale 3D props, and worked on the lighting in UE. And Anthony created some delicious-looking food and bottles of drinks to fill the restaurant with.This project taught me a lot about using Unreal Engine and the process of creating props meant for a game scene. I also got to practice a lot with texturing different materials and working with scale and proportions. Seeing the scene come to life and being able to walk around in it was an incredible experience!

Restaurant Wide Shot

Bar Shot

Bar Close-Up

Upper Floor

Props

Props


To showcase the different spots of this playable scene, Jonathan and I set up some cameras to capture different angles from each zone of the restaurant.
2D Art
Character Concepts

Potion Merchant

Potion Merchant

Potion Maker

Potion Maker

Elder Sheep

Elder Sheep

Elder Sheep Turnaround
The Hunter
The Hunter Sheet

Guardian

Guardian Sheet


L'Ami du Miel - Character Concepts

Character Line Up

Ceil Character Sheet

Darrel Character Sheet

Maggie Character Sheet

Beau Character Sheet

Duval Character Sheet

Props


Animation
Baby Paws - Northeastern University
Social Media Campaign for Undergrad Admissions Marketing
For National Decision Day, I created a short animation to celebrate and welcome the incoming class of 2026 at Northeastern. This animation was used promotionally on Northeastern Undergrad's Instagram and for congratulatory emails sent out by the school.
Tools used: After Effects. Illustrator
(2022)

Shot 1

Shot 2


Celebratory gifs for the Northeastern Undergrad Instagram account.
Tools used: Illustrator. After Effects.
(2023)

Hopping

Howling


Hopping: Concepted by Wendy Jia
Illustrated + Animated by Me
Howl: Concepted + Animated by Me
She Kills Monsters
Short animation to accompany Northeastern University Theatre's production of She Kills Monsters.
This scene plays when Orcus pulls out a large, almost-comical map that details the path the characters must take to the dragon's lair. To create a pop-up book feeling, I projected 2D assets into a 3D environment. Wendy Jia created the dragon asset in the castle scene.
Tools used: After Effects. Maya. Illustrator
(2020)

Swamp Assets

Castle Assets

Forest Assets

Mountain Assets

Map Assets

Backgrounds + Ground


